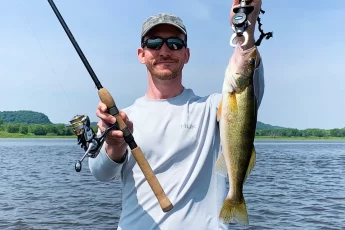
There’s nothing quite like catching and cooking your own dinner! Follow this definitive guide on how to fillet almost any fish including best practices to prepare and store your fillets that maximize food quality and longevity. After reading this guide, filleting your own fish will be a delight!
This guide includes:
- Best Equipment to Clean and Fillet Fish
- Best Equipment to Store Fish Fillets
- How to Fillet Most Fish
- How to Fillet Flatfish
- Pro Fish Filleting Tips for the Best Quality Fillets
- Conclusion
- Fish Filleting Frequently Asked Questions

*Disclosure: I only recommend products I would use myself and all opinions expressed here are my own. This post may contain affiliate links that at no additional cost to you, I may earn a small commission.
Equipment to Clean, Fillet, and Store Fish
Many anglers dislike filleting fish after a long day on the water. It’s a messy process and you’re tired from being out in the sun! Ease the burden by bringing the right tools for the job. Having the right techniques and equipment helps the process and will have you cooking up your fresh catch in no time.
Best Equipment to Clean and Fillet Fish
To efficiently fillet fish you need a clean work area, a quality knife, and a few simple accessories.
Your filleting station should include:
- Fillet Knife (read our in-depth guide on best fillet knives!)
- Cutting Surface (large cutting board or scrap board)
- Large Bowl for Fillets (with icy water)
- Waste Container (I use gallon storage bags)
- Clean Water Source
- Protective Gloves (optional but recommended)

Dedicated filleting stations with running water, large cutting surfaces, equipment storage, and easy fish gut disposal (pelicans love fish guts!) are preferable, but don’t be afraid to fillet your catch on a spare board in your driveway. With a little preparation, filleting doesn’t need to be a painful process.
Best Equipment to Store Fish Fillets
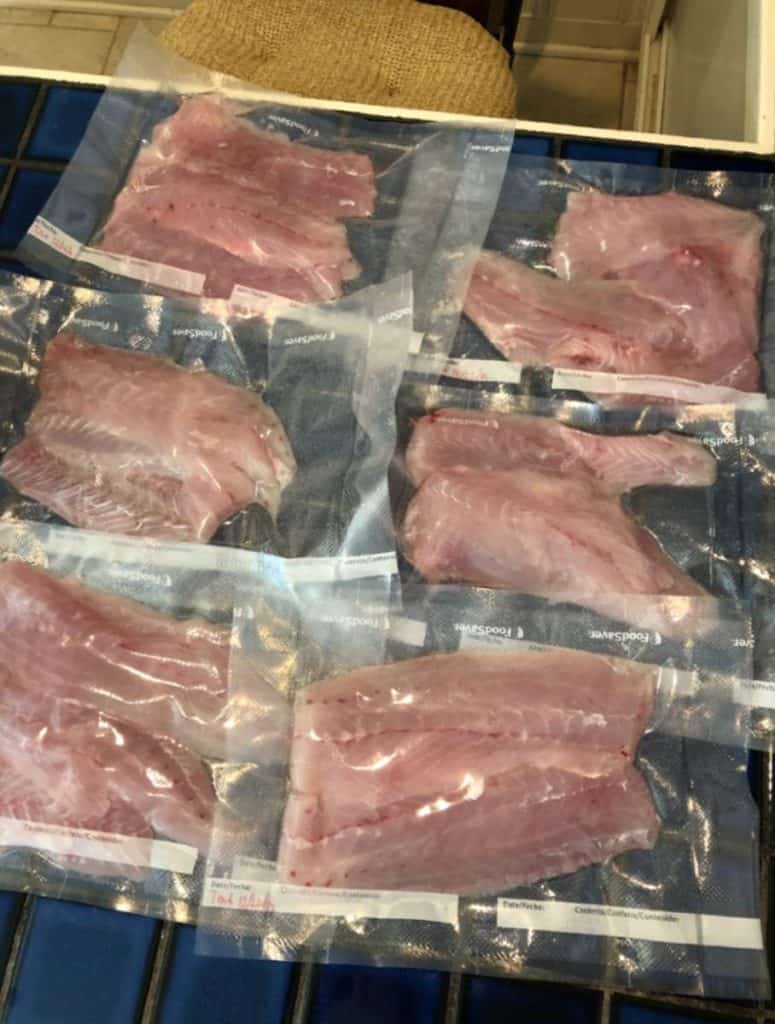
The best method to store fish fillets is by vacuum sealing and storing in the freezer. Properly prepared vacuum sealed fillets keep fresh longer than by any other storage method. If you routinely catch, clean, and eat fish, do yourself a favor and invest in a vacuum sealer. They are relatively affordable and worth their weight in gold if you routinely process fish or wild game.
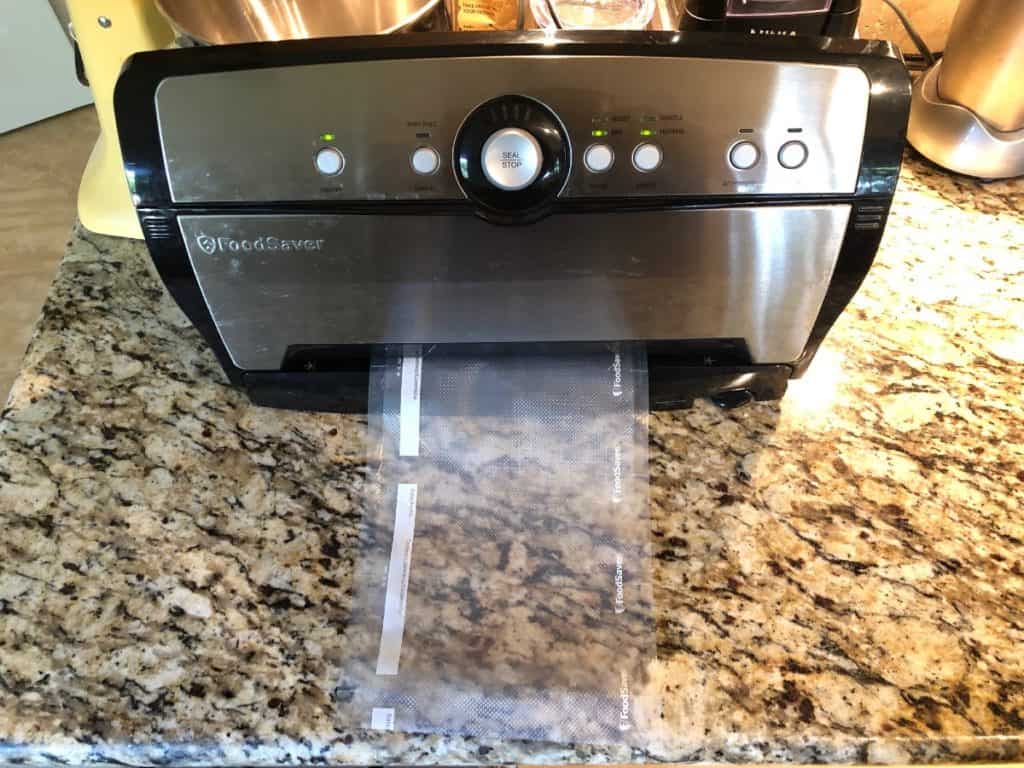
Frozen vacuum sealed fillets stay fresh for months where with other methods the fillet quality may degrade on the scale of weeks.
If you don’t have a vacuum sealer, your best options are to either skip long-term storage and eat your catch within the next few days or freeze your fillets in plastic bags. The best practice when freezing fillets in plastic bags is to add water to the bag to encase the fillets in ice. Fillets frozen in air will quickly get freezer burn and degrade in taste and quality.
Pro Tip: Separate your fillets into ‘meal sized’ portions before freezing. There’s nothing worse than a gallon bag full of 50 frozen fillets when you want to prepare a fish meal for two.
How to Fillet Fish
Fish fall into two main categories that are useful in determining how to remove the fillets for cooking: round fish and flatfish. Round fish have more cylindrical bodies with two main fillets running along either side of the fish. Flatfish are much flatter (surprise surprise), generally have eyes on one side of the body, and yield four fillets.
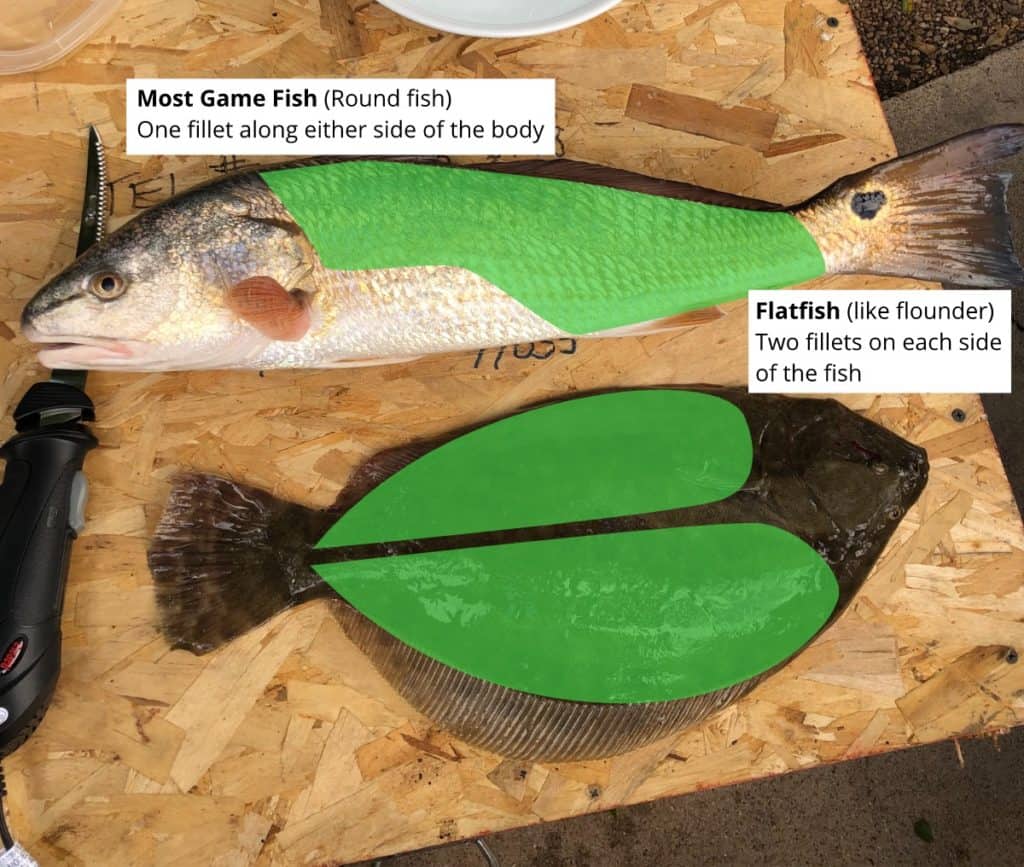
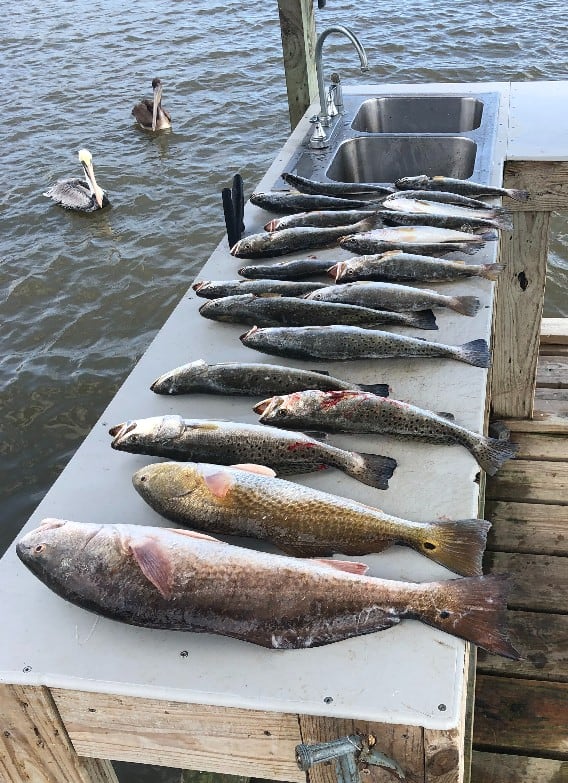
Most edible sports fish are considered round fish and are filleted the same way. Round fish includes largemouth bass, smallmouth bass, white bass, striped bass, salmon, trout, redfish, speckled trout, drum, snapper, crappie, bluegill, walleye, perch, pike, and catfish to name a few!
Flatfish includes flounder, fluke, and sole. The process for filleting flatfish is slightly different from filleting round fish but is not especially difficult.
How to Fillet Most Fish (Round fish)
Most game fish have similar anatomy and are filleted the same way.
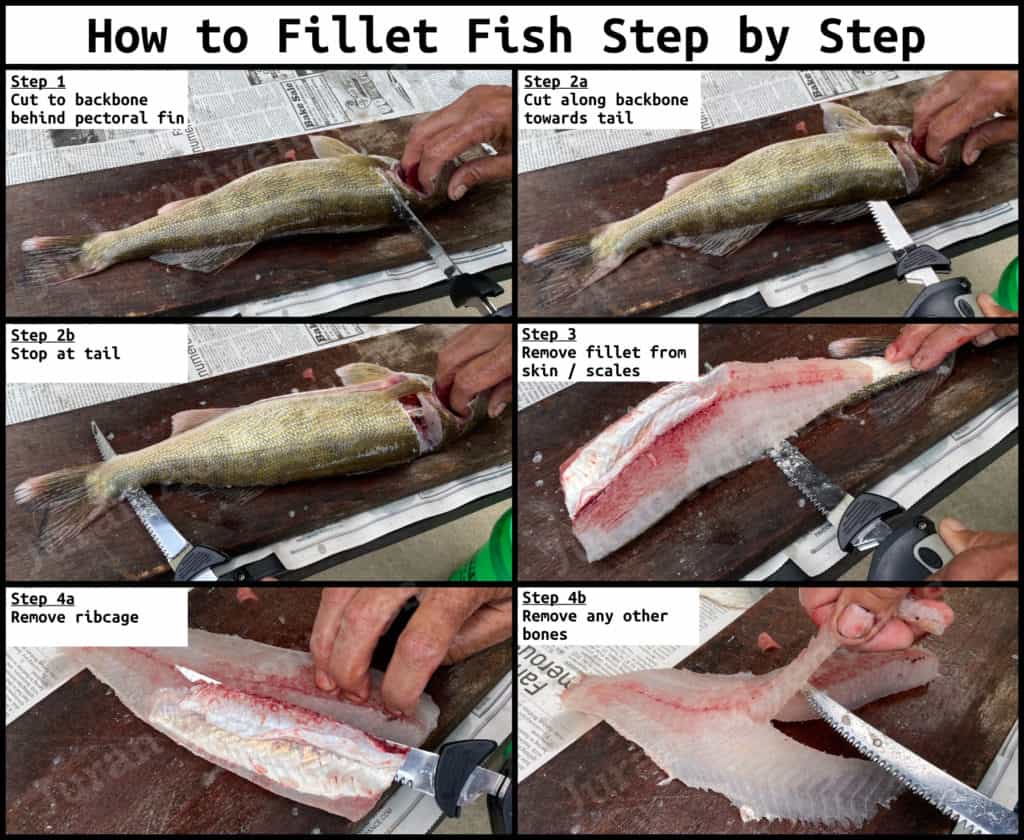
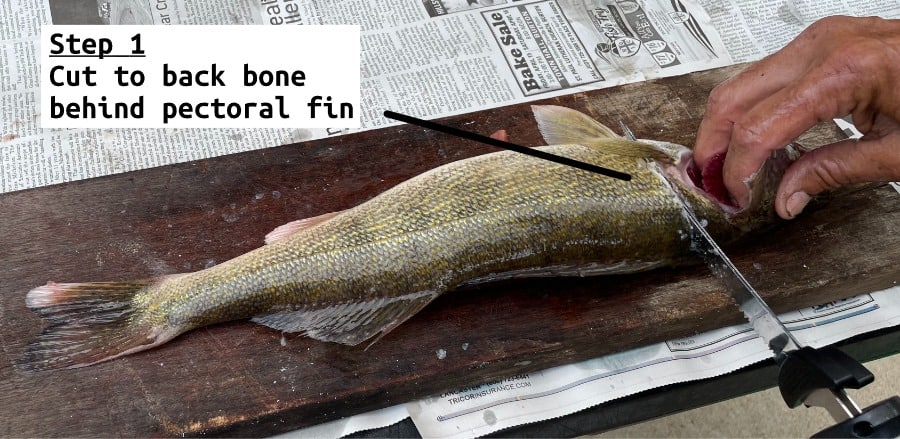
Step 1: Cut to backbone just behind the pectoral fin
Start by making a vertical incision just behind the gills and pectoral fin. If using an electric fillet knife, you can immediately turn the blade towards the tail of the fish and start step 2.
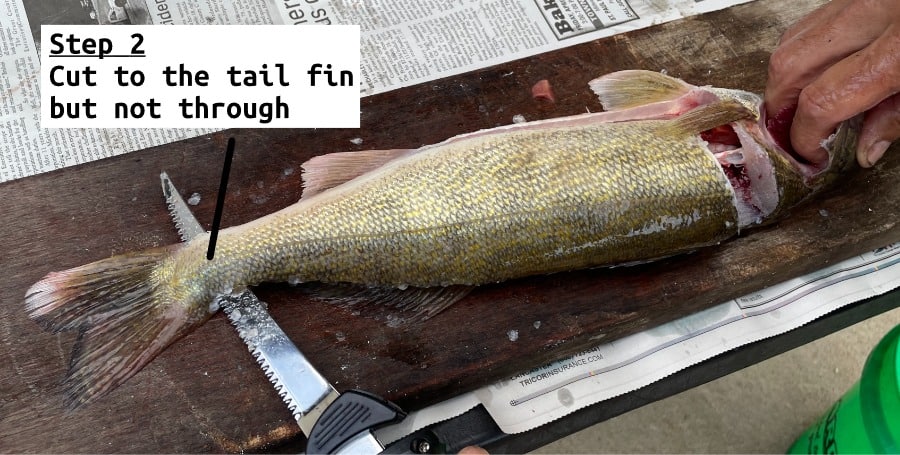
Step 2: Cut along backbone towards the tail
Keep your knife tight to the backbone and begin working towards the tail of the fish. This is where inexperienced filleters can lose some meat. Keep gentle angled pressure against the fish’s backbone to maximize meat retention.
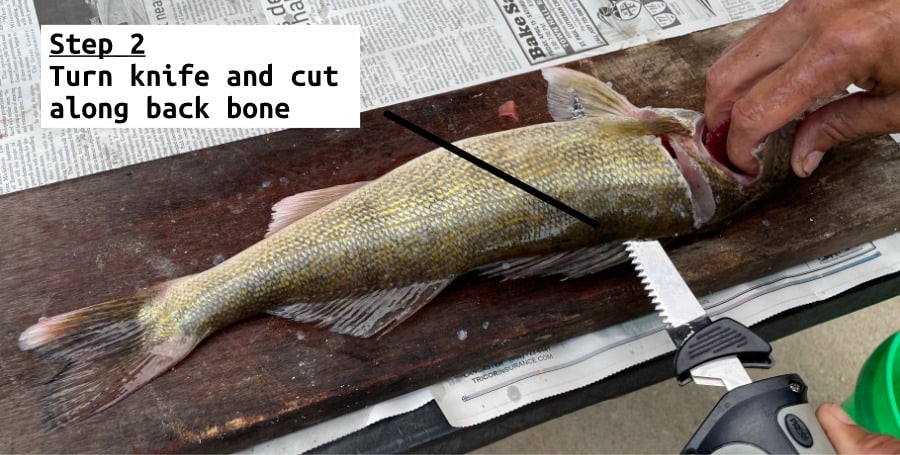
With an electric knife you can make the turn from step 1 to step 2 in one fluid motion. If using a manual knife or filleting a large fish, you may need to perform step 2 starting near the top of the fish and making progressive cuts to separate the fillet from the backbone and rib cage. Rephrased, instead of performing step two from the front of the fish to the back of the fish, you can start at the top of the fish and work your way towards the belly of the fish.
Do not separate the fillet from the fish carcass. Stop cutting near the tail to make step 3 easier!
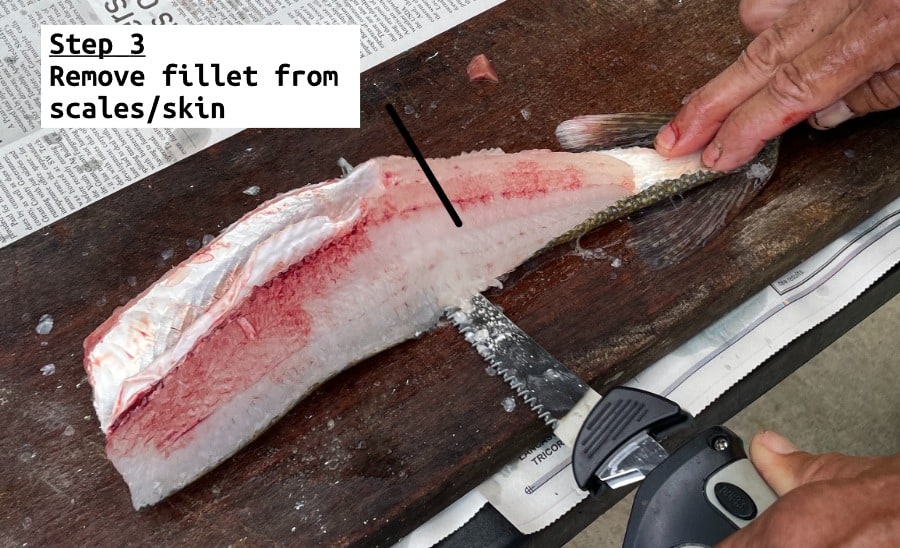
Step 3: Remove fillet from scales / skin
The next step is to separate the fillet from the scales or skin. Flip the fillet towards the tail of the fish so it is scales/skin side down.
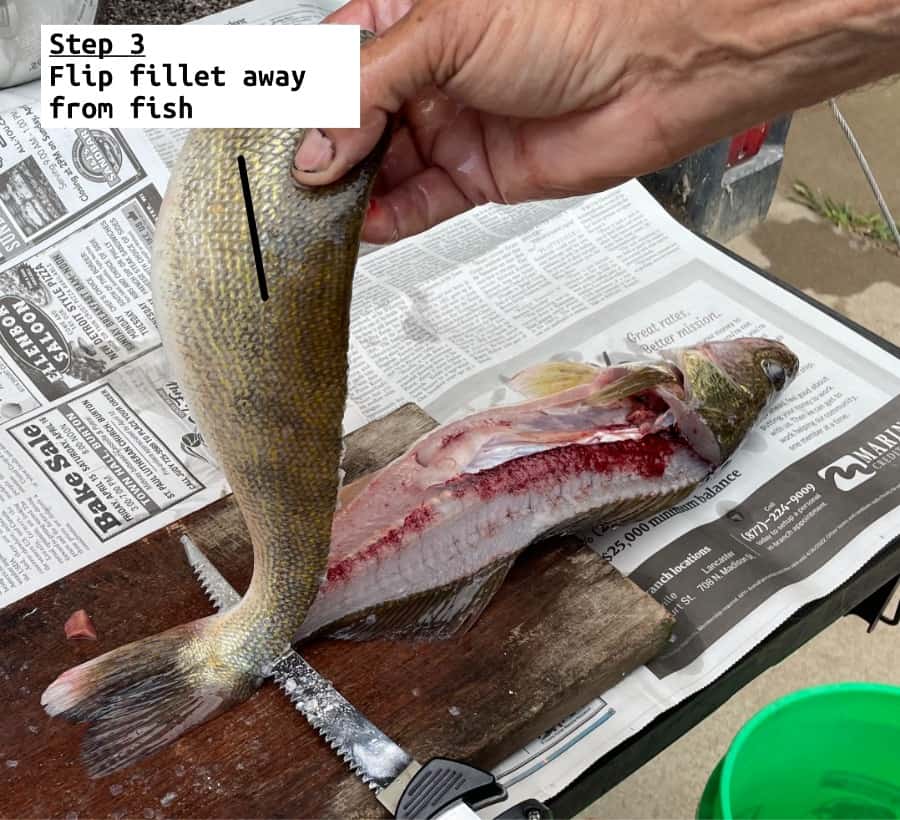
Using the fish carcass as an anchor point, separate the fillet from the scales by running your knife at a slight downward angle against the scales.
Step 4: Remove bones
Next, remove any bones. For rib bones – feel where the rib bones are with your hand then use your knife to follow the rib cage and retain as much meat as possible. On smaller fish, there may not be enough meat outside the ribs to be worth the time and you can just cut that whole section off.
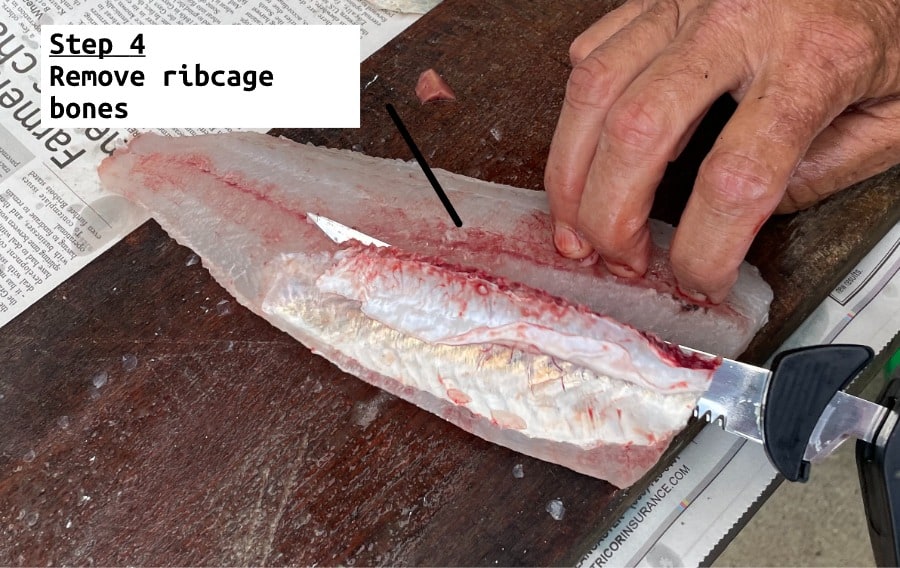
Feel the fillet for any other bones and remove as needed.

Step 5: Flip fish over and repeat steps 1-4 on other side
Flip the fish over and remove the remaining fillet by repeating steps 1-4.
Step 6: Clean and store fillets
The final step to filleting fish is to clean and store the fillets. Under cold water, rinse your fillets and remove any blood, dirt, and debris. Next, either vacuum pack them with your new vacuum sealer and send them straight to the freezer, or get the oil hot for the fish fry!
Tips for How to Fillet Catfish
Catfish can be filleted by the method above or alternatively by skinning them before cutting the fillet away from the carcass. Catfish have soft skin that is easy to accidentally cut through in step 4 above.
To skin a catfish, start the perimeter of cuts mentioned in steps 1 & 2 above. Next, grab the skin with a pliers or catfish skinning tool and peel the skin off the fillet. Now you can go back and cut the fillet off the fish according to step 2 above.
Tips for How to Fillet Northern Pike
Northern pike are a delicious fish that many people don’t consider keeping because of the ‘Y’ bones in the fillets. Pike have another row of bones running along the upper third of the fillet that add another challenge to filleting. Do not be afraid! Take the extra step with filleting these fish and you’ll be rewarded with firm flaky fillets.
Start by filleting a Northern Pike just like any other fish. Once you have the fillet removed from the carcass, the easiest way to remove the ‘Y’ bones is to cut out the strip of meat and bones that holds the ‘Y’ bones. You will end up with a disjointed fillet that looks like a pair of pants, but that’s ok if it has no bones!
Another option for Northern Pike is to pickle them. When you pickle pike the ‘Y’ bones dissolve so you don’t even need to remove them!
How to Fillet Flatfish Like Flounder, Fluke, and Sole
Flounder may look strange but they’re fairly easy to fillet (and they’re delicious!). Unlike most other fish, flounder have four fillets. Filleting flounder is similar to filleting round fish. The main difference is that Step 1 includes a starter cut along the spine of the fish.
Step 1: Cut to backbone just behind the pectoral fin & create incision along spine
Just like with round fish, start filleting your flatfish by creating a vertical incision to the backbone just behind the gills and pectoral fin. Next, follow the fish’s spine with your knife to split the top and bottom fillets
Step 2: Cut along backbone towards the tail
Start cutting away the fillet from the fish by running the knife along the back bones towards the tail. Just like with round fish, you can do this either from the fish head to tail or start from the spine and work your way to the outside of the fish.
Do not separate the fillet from the fish carcass just yet. Stop cutting near the tail to make step 3 easier!
Step 3: Remove fillet from scales / skin
The next step is to separate the fillet from the scales or skin. Flip the fillet towards the tail of the fish so it is scales/skin side down. Using the fish carcass as an anchor point, separate the fillet from the scales by running your knife at a slight downward angle against the scales.
Step 4: Remove bones
The final step in removing a fish fillet is removing any bones. For rib bones – feel where the rib bones are with your hand then use your knife to follow the rib cage and retain as much meat as possible. On smaller fish there may not be enough meat outside the ribs to be worth the time and you can just cut that whole section off. Feel the fillet for any other bones and remove as needed.
Step 5: Flip fish over and repeat steps 1-4 on other side
Flip the fish over and remove the remaining fillets by repeating steps 1-4. The fillets from the white underside of flounder will be slightly smaller than from the top side.
How to Fillet Fish: Pro Tips For the Best Quality Fillets
This section highlights some best practices to get the highest quality fillets from the water to your frying pan. Quick reminder to follow your local laws and regulations – some of these practices are not allowed everywhere (for example, disposing of fish carcasses in the water is illegal in many places!).
Keep Fish Alive as Long as Possible
Minimize time between when the fish expires and you fillet it to minimize bacteria growth. Keeping fish alive in a livewell is great for this.
Resist the urge to ‘fillet them tomorrow’. Make it a habit to fillet any kept fish ASAP once you are off the water to save you any headaches of wasted fish. Respect nature and don’t waste what you keep.
Keep the Fish Cool
Warm fillets spoil quickly. For the best quality meat, keep the fillets as cool as possible throughout the whole process. When you catch a keeper fish, put it in a circulated livewell or on ice immediately.
When filleting fish, keep them cold and out of the sun. I recommend putting processed fillets in a bowl of ice water as you fillet the remaining fish.
Bleed Your Fish For Cleaner Fillets
Bleeding fish immediately after catching them is both a humane way to dispatch fish and results in cleaner meat. Cut the artery connected to the gills to bleed the fish out. Bled fish will have whiter, cleaner flesh.
Remove Parasites if Needed
Visually inspect fillets as you process fish. Parasites in fish are common and generally considered harmless to humans. Harmless or not, worms in fillets are unappealing and I personally make a point to remove them before consuming the fish.
Wash and Store Fillets Properly
Keep your work area clean as you fillet fish. Thoroughly wash fillets before you package them for later consumption. As mentioned above, the best method to store fish fillets is by vacuum sealing and storing in the freezer. Second best would be encased in water and frozen in a plastic bag.
Best Ways to Dispose of Fish Carcasses
If allowed, the easiest way to dispose of carcasses is to return them to the water to let the crabs and catfish have a snack. Unfortunately, this practice isn’t allowed in many places. The next best way to dispose of fish carcasses is to double bag them, freeze them, then put them out on trash day.
Alternatively, many people use fish heads to fertilize their gardens. Be aware, this practice may draw rodents or cats. Another option is to make fish stock.
Fish Filleting Conclusion
Processing your own fish fillets is a breeze with the right equipment and techniques. Keep your fresh catch cool and clean to maximize meat quality.
Take your filleting game up a notch by upgrading to an electric fillet knife – you’ll be able to zip up a boat load of fish in no-time. Invest in a vacuum sealer to allow for the most effective fillet storage method. Vacuum seal and freeze your fish in meal sized portions for fresh tasting fillets for months to come.
Check out our fishing rod articles for solid rod options to help catch the fish you’ll be filleting:
- Best Bass Fishing Rods
- Best Walleye Rods
- Best Flipping & Pitching Rods
- Best Frog Fishing Rods
- Best Inshore Fishing Rods
- Best Saltwater Fishing Rods
- Best Surf Fishing Rods
- Best Pier Fishing Rods
Check out our articles for great reels to pair with these rods:
- Best Baitcasting Reels
- Best Surf Fishing Reels
- Best Saltwater Baitcasting Reels
- Best Saltwater Spinning Reels
Fish Filleting Frequently Asked Questions
Can you eat fish skin?
Fish skin is edible and is a popular snack in many cultures. If the fish has been properly cleaned, the skin is typically safe to eat. Be sure to remove the outer scales if you intend to eat the fish skin!
How long can you leave fresh fish on ice before filleting?
If kept on ice and cold, fresh fish can be kept for 24-48 hours before filleting. Best practice is to fillet fish as soon as possible after they expire. Keep fish alive in a live well or immediately put them on ice to maximize fillet quality. If not kept cold, fish can go bad in 6 hours or less.
Should I wash fish before freezing?
Always wash fish fillets before freezing. Rinse fillets under cold water and remove any blood, dirt, or debris.
Do you need to gut fish before filleting?
Fish do not need to be gutted before filleting. When removing the fish fillets, the fish guts will stay with the rest of the fish carcass for easy disposal.
What is the best way to freeze fresh fish?
The best method to store fish fillets is by vacuum sealing and storing in the freezer. Properly prepared vacuum sealed fillets keep fresh longer than by any other storage method.
Written By: Andrew Juran
Andrew is a seasoned angler with over 25 years of experience fishing across the United States. He has caught hundreds of fish using various techniques and mentored many in the art of fishing. An advocate for sustainable fishing, Andrew is an active member of the Coastal Conservation Association, an organization committed to marine conservation.
For frequent fishing tips, behind-the-scenes looks, and real-time catches, connect with Andrew on Instagram